
QESS is a spread sheet application for Android smart phone focusing on effective entry. It has editable keypads.
The layout of the keypad can be edited freely. This document describes the usage and meaning of sample layout files included in the application. Please refer the original sample layout files to confirm the full description by using a spread sheet appilication such as Excel.
To browse the file by using QESS, check 'Layout Edit Mode' in menu→Settings.
When a file having extension '.csv' is edited by Excel or other application, the file may not be saved as CSV (Comma Separated value). The file may be saved as TSV (Tab Separated Value). In this case, change file extension from '.csv' to '.tsv'.
| sampleScoring | Entering evaluation scores sequentially from the top of a list. |
| sampleAttendance | Entering records of attend/absent sequentially from the top of a list. |
| sampleChecking | Adding and delete checkmarks in a sheet. |
| sampleCounter | Counting something. |
| sampleCounter2 | Classifying something and counting. |
| sampleLogging | Recording a log. |
| sampleQuestionnaire | Filling in a questionnaire. |
| sampleCashcalc | Implementing a cashbook calculator. |
| sampleMultimodal | Trying Voice input, QRcode/barcode input, QRcode output, geo location input and text to speech. |
| sampleCommands | Trying various commands. |
| sampleJump | Trying conditional jumps and loops. |
| sampleFormula | Trying formulas. Need to set both edges of the range to calculate sum and count. |
| sampleJavaScript | Trying JavaScript. |
| sampleRpnCalc | Implementing an RPN calculator using JavaScript. |
| sampleLogCalc | Implementing an calculator with log using JavaScript. |
| nullKeypad | Keypad is not shown. |
| sampleBasicCalc | Implementing a basic calculator. |
| sampleSciCalc | Implementing a scientific calculator. |
| sampleMenuCmd | Trying <MENU menuItem> command. |
| sampleKeyShortcut | Sample key shortcuts useful when connecting physical keyboard. |

When touching a key, The string shown on the key is entered into the current cell. When touching 'Clear' key, the current cell is cleared. Then the current cell is moved below.
The 'Excellent' key is described in the layout file as follows.
| ButtonText | Excellent |
| ButtonCommand | <CLR>Excellent<DOWN> |
| Meaning | Clear the current cell→Add 'Excellent' to the cell→Move the cell down |
In the command sequence of 'Clear' key, the addition of string is skipped.
| ButtonText | Clear |
| ButtonCommand | <CLR><DOWN> |
| Meaning | Clear the current cell→Move the cell down |

When touching a key, The corrensonding string is entered into the current cell. When touching 'Clear' key, the current cell is cleared. Then the current cell is moved below.
The layout description is very similar to the above sampleScoring. The 'Attend' key is described in the layout file as follows.
| ButtonText | Attend |
| ButtonCommand | <CLR>Att.<DOWN> |
| Meaning | Clear the current cell→Add 'Att.' to the cell→Move the cell down |
Other keys have similar description. The string shown on the key and string entered into the cell can be different. The Unicode string can be described.

'Chk' key adds a check mark into the current cell. 'Unchk' key removes a check mark from the current cell. Arrow keys move the current cell.
The 'Chk' / 'Unchk' keys are described in the layout file as follows.
| ButtonText | Chk | Unchk |
| ButtonCommand | ✓ | <BS> |
| Meaning | Add '✓' into the current cell | BackSpace (Remove last character) |
Arrow keys are described in the layout file as follows.
| ButtonText | < | ^ | > | v |
| ButtonCommand | <LEFT> | <UP> | <RIGHT> | <DOWN> |
| Meaning | Move to left cell | Move to up cell | Move to right cell | Move to down cell |

The '+' key increments the value of the current cell. The '-' key decrements the value of the current cell. The 'CLR' key clears the current cell.
The '+' key is described in the layout file as follows.
| ButtonText | + |
| ButtonCommand | +1<EVAL> |
| Meaning | Add string '+1' into the current cell→Evaluate as arithmetic |
When the cell has '2', the string becomes '2+1' by the addition of '+1'. The evaluation of the string is '3'. When the cell is blank, the string becomes '+1' by the addition of '+1'. The evaluation of the string is '1'. The "-" key has similar description. The 'CLR' key has command "<CLR>" to erase the content of the current cell.
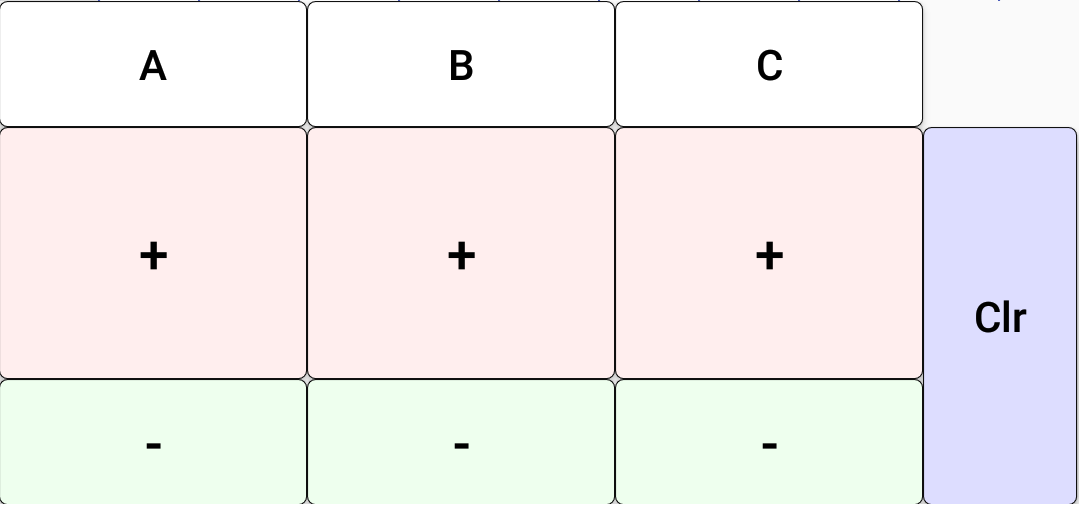
The '+'/'-' keys in columns 'A', 'B' and 'C' increment/decrement the A1, B1 and C1 cell values. The 'CLR' key clears the current cell.
The '+' key in the column 'A' is described in the layout file as follows.
| ButtonText | + |
| ButtonCommand | <GO A1>+1<EVAL> |
| Meaning | Move to 'A1' cell→Add string '+1' into the current cell→Evaluate as arithmetic |
Movement of the current cell is added to the above 'sampleCounter'. Commands of other keys are same except the string of '+'/'-' and 'A1'/'B1'/'C1'.

The 'Start' key enters the string 'start' and the current time into the adjacent cells. The 'Stop' key enters the string 'stop' and the current time into the adjacent cells. The 'Clear' key clears the cell. The current cell is moved downward after each processing.
The 'Start' key is described in the layout file as follows.
| ButtonText | Start |
| ButtonCommand | <CLR>start<RIGHT><CLR><NOW TIME><DOWN><LEFT> |
| Meaning | Clear the current cell→Add string 'start' to the cell→Move to right cell →Clear the current cell→Add current time to the cell→Move to down cell→Move to left cell |

Each key of 'Sex','Age','Q1','Q2','Q3','Q4' shows the question, and inputs the answer into the corresponding cell. For the 'Sex' and 'Age' keys, the string of selected answer is entered. For the 'Q1','Q2','Q3','Q4' keys, the index number of selected answer is entered. The 'AnswerAll' key repeats all questions sequentially.
The 'Sex' key is described in the layout file as follows.
| ButtonText | Sex |
| ButtonCommand | <GO RC1><CLR><LIST Sex> |
| Meaning | Move to RC1 (Same row and first Column) cell→Clear the cell→ Show list named 'Sex' and add the answer string into the cell |
The list is described in the same layout file as follows.
| Sex | Male or Female? | Male | Female | Other |
as the 'Q1' key or later uses the command <LISTN name> instead of <LIST name>, the value entered into cell is not the answer string but the answer index (a number starting from zero). The 'AnswerAll' key describes the commands of above keys sequentially.
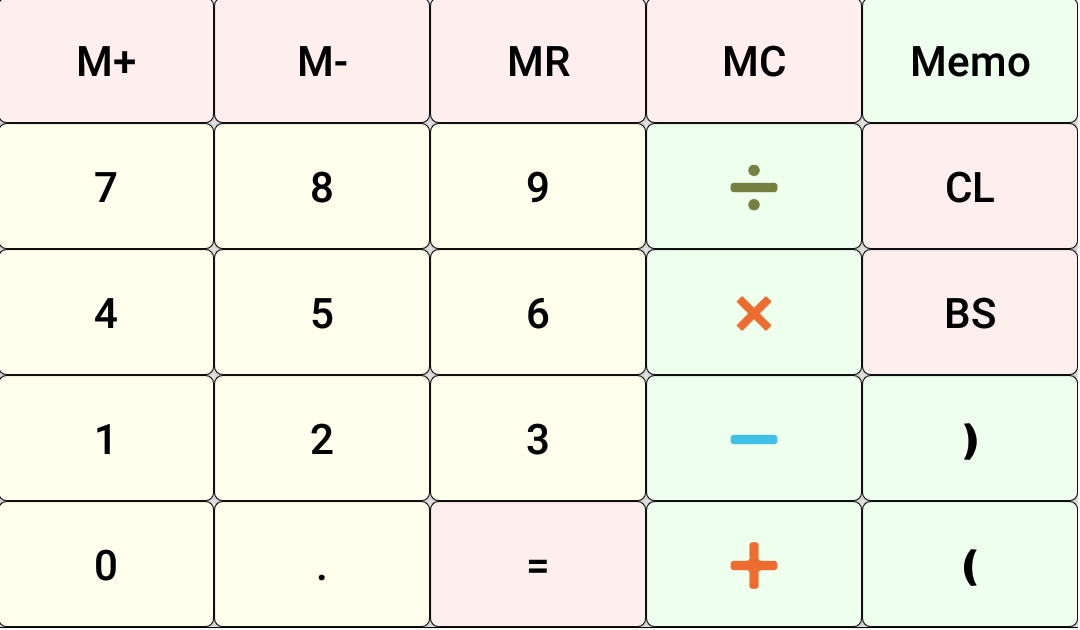
It realizes a popular calculator. The 'Memo' key enters the category and date of expenses. The memory function uses the keys 'M+'(Memory Plus), 'M-'(Memory Minus), 'MR'(Memory Recall), and 'MC'(Memory Clear). The E1 cell shows the value of memory.
The commands of the numeric key is the numeric character itself. Also the commands of operators, decimal point, and parentheses are the character itself. The arithmetic expression is formed by connecting these characters.
| ButtonText | 7 | 8 | 9 | \u2797 |
| ButtonCommand | 7 | 8 | 9 | / |
| Meaning | Add '7' to the cell | Add '8' to the cell | Add '9' to the cell | Ass '/' to the cell |
A numeric value does not change, even if a character '.' is added. Thus the character is added after string conversion. For a similar reason, a character '0' is also added after string conversion.
| ButtonText | 0 | . |
| ButtonCommand | <TYPE STR>0 | <TYPE STR>. |
| Meaning | Change cell type to string→add '0' | Change cell type to string→add '.' |
The '=' key executes the movement and evaluation of the cell.
| ButtonText | = |
| ButtonCommand | <RIGHT><CLR><EVAL R[0]C[-1]><DOWN><LEFT> |
| Meaning | Move to right cell→Clear cell→Evaluate right cell→Move to down cell→Move to left cell |
The 'Memo' key enters the category and the date of expenses in the adjacent cells.
| ButtonText | Memo |
| ButtonCommand | <CLR><LIST Expenses><RIGHT><CLR><NOW DATE> |
| Meaning | Clear the cell→Show list named 'Expenses' and add the answer string into the cell →Move to right cell→Clear the cell→Enter current date |
| Expenses | expenses | foods | commodity | recreation | closes | ... |
The keys 'M+','M-','MR','MC' realizes memory function.
| ButtonText | M+ |
| ButtonCommand | <SETV @val><GO E1><CLR><GET @mem>+<GET @val><EVAL><SETV @mem><GO BACK><DOWN> |
| Meaning | Set the cell value to @val→Move to E1 cell→Clear the cell→ Get the value of @mem and add to the cell→Add string '+' to the cell→Get the value of @val and add to the cell→ Evaluate the cell→Set the cell value to @mem→Move to previous cell→Move to down cell |
Memory function is changed to the description of JavaScript.

The 'VoiceIn' is voice recognition input. The 'VoiceInSeq' is the repetition of 'VoiceIn'. The 'QRcodeIn' is the QR code input. The 'QRcodeOut' is the QR code output. the 'Location' is the location input. The latitude and longitude of current position is entered such as '37.421998333333335,-122.08400000000002'. The location is searched by using GPS or network. Using network is less accuracy and less power. The 'TripMemo' is the input of current location, current time, and voice recognition memo. The 'WebSearch' searches the current cell content on the Web (GoogleSearch). When executed on the cell having location (latitude,logitude), the map of the location is displayed. When executed on the cell having URL, the web page is displayed. The 'SpeakOut' speaks the current cell content.
The keys of 'VoiceIn','QRcodeIn','Location','WebSearch' are described in the layout file as follows.
| ButtonText | VoiceIn | QRcodeIn | Location | WebSearch |
| ButtonCommand | <VOICE><DOWN> | <QRCODE><DOWN> | <LOCATION><DOWN> | <WEB><DOWN> |
| Meaning | Voice input→Move to down cell | QRcode input→Move to down cell | Location input→Move to down cell | Web search of the current cell text→Move to down cell |
The 'VoiceInSeq' is the loop execution of commands for 'VoiceIn'. The 'QRcodeOut' executes the qr code output function.
| ButtonText | VoiceInSeq | QRcodeOut |
| ButtonCommand | <LBL a><VOICE><DOWN><JMP a> | <QRCODE OUT> |
| Meaning | Label a→Voice input→Move to down cell→Jump to label a | QR code output |
The 'TripMemo' executes the location input, cell movement, time input, cell movement and voice input sequentially. The 'SpeakOut' executes the text-to-speech function.
| ButtonText | TripMemo | SpeakOut |
| ButtonCommand | <LOCATION><RIGHT><NOW DATETIME><RIGHT><VOICE><GO R[1]C[-2]> | <SPEAK> |
| Meaning | Location input→Move to right cell→Date time input→Move to right cell→Voice input→Move to the cell at 1 down and 2 left. | Speak out the current cell content. |
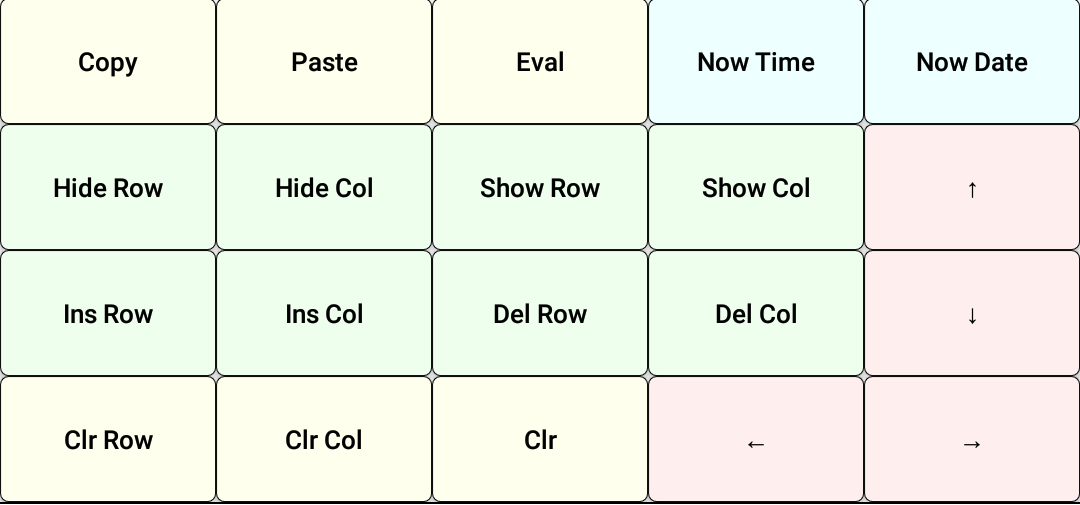
This layout is the trial of various commands.
Each command in layout file corresponds to the string on each key. refer Help for the detail of command. The texts for arrows are Unicode expression.
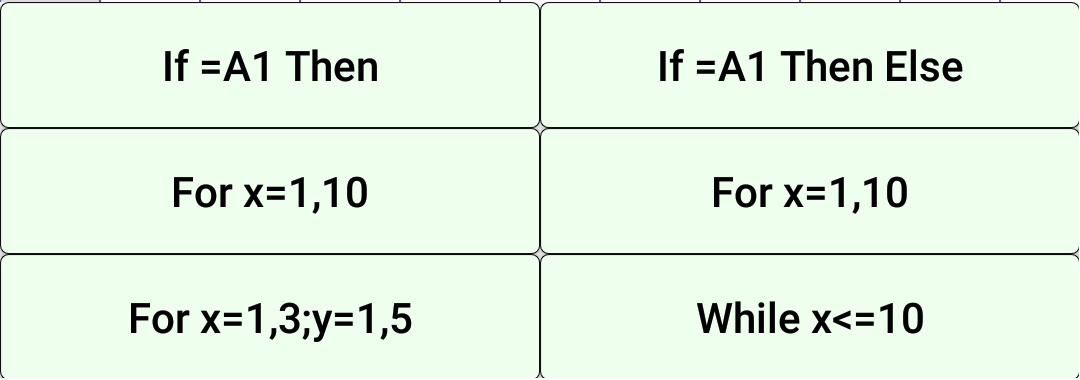
This is a sample for understanding the jump.
The 'If=A1 Then' key is a sample of the conditional jump. When the value of the current cell value equals to A1 cell, the string 'Same' is entered into the right cell. Otherwise nothing is done.
The 'If =A1 Then Else' key is the other sample of the conditional jump. When the value of the current cell value equals to A1 cell, the string 'Same' is entered into the right cell. Otherwise the string 'Diff' is entered into the right cell.
The 'For x=1,10' key is a sample of the definite loop. The string 'AA' is entered into 10 cells from the current cell to downward.
The other 'For x=1,10' key is another sample of the definite loop. It enters the incremental values from the current cell to downward.
The 'For x=1,3;y=1,5' key is a sample of a definite double loop. It fills the string 'AA' to the cell between the current cell and the cell at 5-down and 3-right.
The 'While x<=10' key is a sample of indefinite loop. It repeats while a variable is less than or equals to 10.
The 'If=A1 Then' key is described in the layout file as follows.
| ButtonText | If =A1 Then |
| ButtonCommand | <JNE A1 x><RIGHT><CLR>Same<LBL x> |
| Meaning | If the current cell value is not equals to A1 cell, jump to label x→ Move to right cell→Clear the cell→Add string 'Same'→Label x |
The 'If =A1 Then Else' key is described in the layout file as follows.
| ButtonText | If =A1 Then Else |
| ButtonCommand | <JNE A1 x><RIGHT><CLR>Same<JMP y><LBL x><RIGHT><CLR>Diff<LBL y> |
| Meaning | If the current cell value is not equals to A1 cell, jump to label x→ Move to right cell→Clear the cell→Add string 'Same' to the cell→Jump to label y→ Label x→Move to right cell→Clear the cell→Add string 'Diff' to the cell→Label y |
The 'For x=1,10' key is described in the layout file as follows.
| ButtonText | For x=1,10 |
| ButtonCommand | <JLMT x 10><LBL x><CLR>AA<DOWN><JMP x> |
| Meaning | Limit the jump count of label x to 10→Label x→Clear the cell →Add string 'AA' to the cell→Move to down cell→Jump to label x |
Another 'For x=1,10' key is described in the layout file as follows.
| ButtonText | For x=1,10 |
| ButtonCommand | <CLR>1<JLMT x 9><LBL x><DOWN><CLR>R[-1]C+1<EVAL><JMP x> |
| Meaning | Clear the cell→Add '1' to the cell→Limit the jump count of label x to 9 →Label x→Move to down cell→Clear the cell→Add string 'R[-1]C+1' to the cell→ Evaluate the cell→Jump to label x |
The 'For x=1,3;y=1,5' key is described in the layout file as follows.
| ButtonText | For x=1,3;y=1,5 |
| ButtonCommand | <SETR @s><JLMT x 3><LBL x><JLMT y 5> <LBL y><CLR>AA<DOWN><JMP y><GO @s><RIGHT><SETR @s><JMP x> |
| Meaning | Set the current cell reference (such as A1) to variable @s→Limit the jump count of label x to 3 →Label x→Limit the jump count of label y to 5→Label y→Clear the cell→Add string 'AA' to the cell→ Move to down cell→Jump to label y→Move to the cell refered by @s→Move to right cell→ Set the current cell reference to @s→Jump to label x |
The 'While x<=10' key is described in the layout file as follows.
| ButtonText | While x<=10 |
| ButtonCommand | <GO B1><CLR>10<GO BACK><CLR>0<JLMT x 100> <LBL x><DOWN><CLR>R[-1]C + 1<EVAL><JLT B1 x> |
| Meaning | Move to B1 cell→Clear the cell→Add string '10' to the cell→Move to previous cell→ Clear the cell→Add string '0' to the cell→Limit the jump count of label x to 100→Label x→ Move to down cell→Clear the cell→Add string 'R[-1]C+1' to the cell→Evaluate the cell→ If the current cell value is less than B1 cell, jump to label x |

This is the sample for understanding the Excel formula.
The 'f(cell)' applys the Excel formula to the current cell.
The 'Set Corner' assigns the two corners of the range. Use this key to assign the range before touching the following 'f(range/rows/cols)'. To assign a range, touch this key on an edge of the range and touch again on other edge of the range.
The 'Help' shows the help message.
The 'f(range)' applys an Excel formula to the range.
The 'f(rows)' applys an Excel formula to the rows included in the range.
The 'f(cols)' applys an Excel formula to the columns included in the range.
The 'f(cell)' key is described in the layout file as follows.
| ButtonText | f(cell) |
| ButtonCommand | <SETV @x><CLR><LIST cellfunc>(<GET @x>)<TYPE FRML> |
| Meaning | Set cell value to @x→Clear the cell→Show list 'cellfunc' (and wait the input)→add '('→Get @x and add to the cell→add ')'→Change cell type to formula |
The cell string is formed as: cellfunc + '(' + @x + ')'. The 'cellfunc' is selected from the list defined as follows in the layout file.
| cellfunc | Cell Functions | sqrt | sin | cos | tan | asin | acos | atan | exp | ln | log | log10 |
The 'Set Corners' key is described in the layout file as follows.
| ButtonText | Set Corners |
| ButtonCommand | <CLR><RANGE> |
| Meaning | Start/end the assignment of the range |
The 'f(range/rows/cols)' key is similar to the 'f(cell)' key.

Trying JavaScript and Dialog.
See Help for the details.
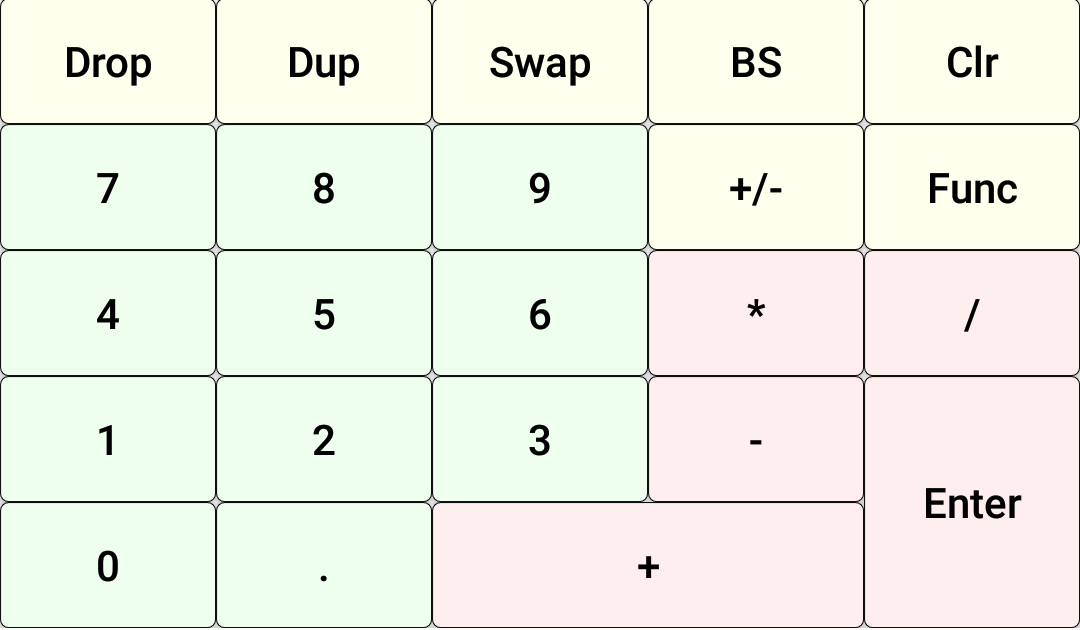
A RPN (Reverse Polish Notation) calculator is realized. The 'RPN' is an expression placing the operators after the operands. It was employed in HP calculators. An addition '2+3' is expressed as '2 3 +'. In this calculator, the key touch is as '[2] [Enter] [3] [+]'. The functions can be modified in the layout file.
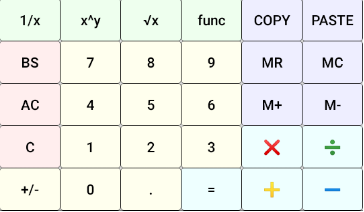
A calculator having calculation log is realized. It records the result of each operation on each row. The functions can be modified in the layout file.
No keypad is shown. Select this layout when you need no keypad.
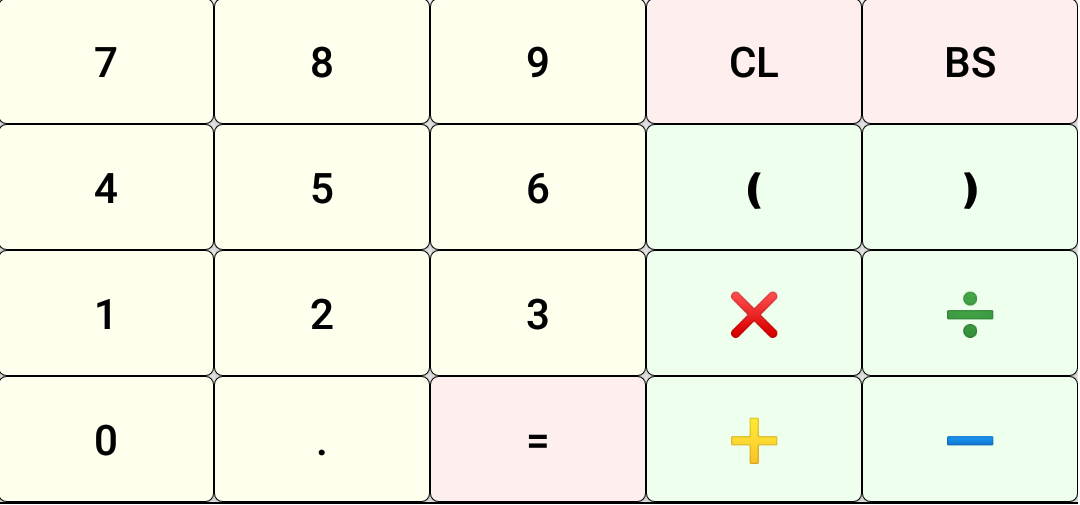
A simple basic calculator is realized. It uses the current cell only for the calculation. The arithmetic expression is used for the implementation.
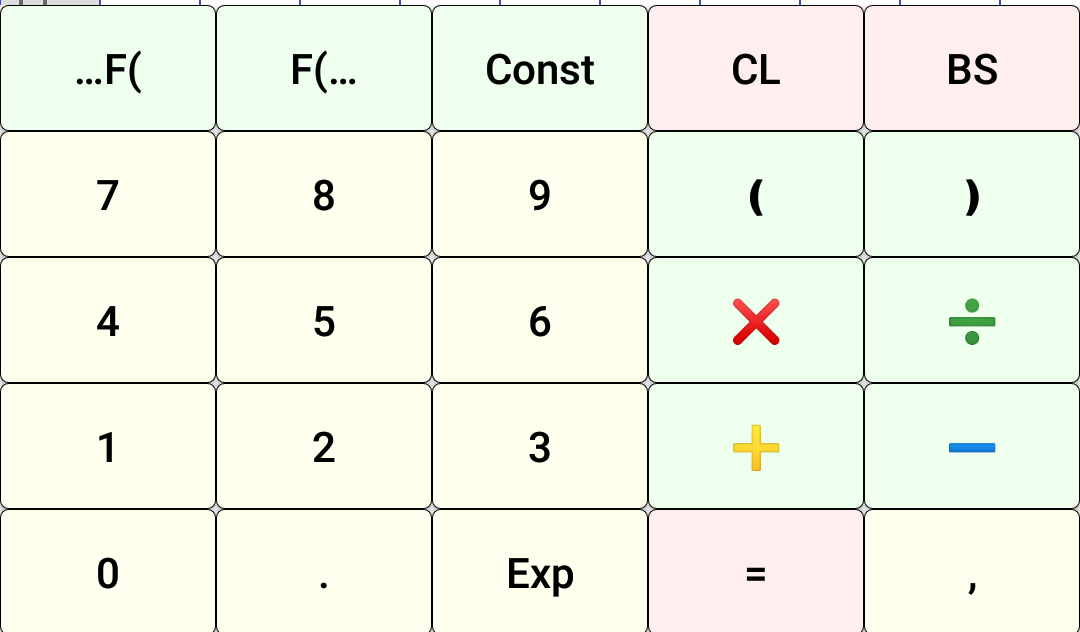
A scientific calculator is realized. It uses the current cell only for the calculation. The lists of functions and constants can be modified in the layout file. The Excel formula is used for the implementation.

This is a sample for understanding the command <MENU menuItem>.
No keypad is shown. Only the key shortcuts are defined. This setting is useful when connecting physical keyboard.
The defined shortcuts can be confirmed in 'Menu>Layout Edit Mode'. The sample defines 'Ctrl+C' (Copy), 'Ctrl+V' (Paste), 'Alt+M' (Show Option Menu) and others.
If you devise a layout, please inform me by an email. The useful layout will be added in this page.